How to Make a Minecraft Skin: Java & Bedrock Guide
Make a Minecraft skin by choosing a base, painting its texture, checking the character in 3D and exporting for your edition. This walkthrough uses Skincubed in your browser; you do not need a separate drawing app.
Before you start
You need a modern browser and an idea for your character. To wear the finished skin, you also need Minecraft on a supported device. Java uses a PNG texture; Bedrock on Android, iOS and Windows can import custom skin files. Xbox, PlayStation and Switch cannot directly import a custom PNG or .mcpack.
Start with a small palette and a recognizable outfit. The editor supports 64×64 textures and legacy 64×32 imports, rather than 128×128 editing. You can choose a base in the template library before opening the workbench.
1. Choose a base and arm model
Open the editor and use New skin to pick an original starter template. Choose Classic for four-pixel-wide arms or Slim for three-pixel-wide arms. You can also import a 64×64 PNG you have permission to edit; old 64×32 textures are converted to the modern layout.
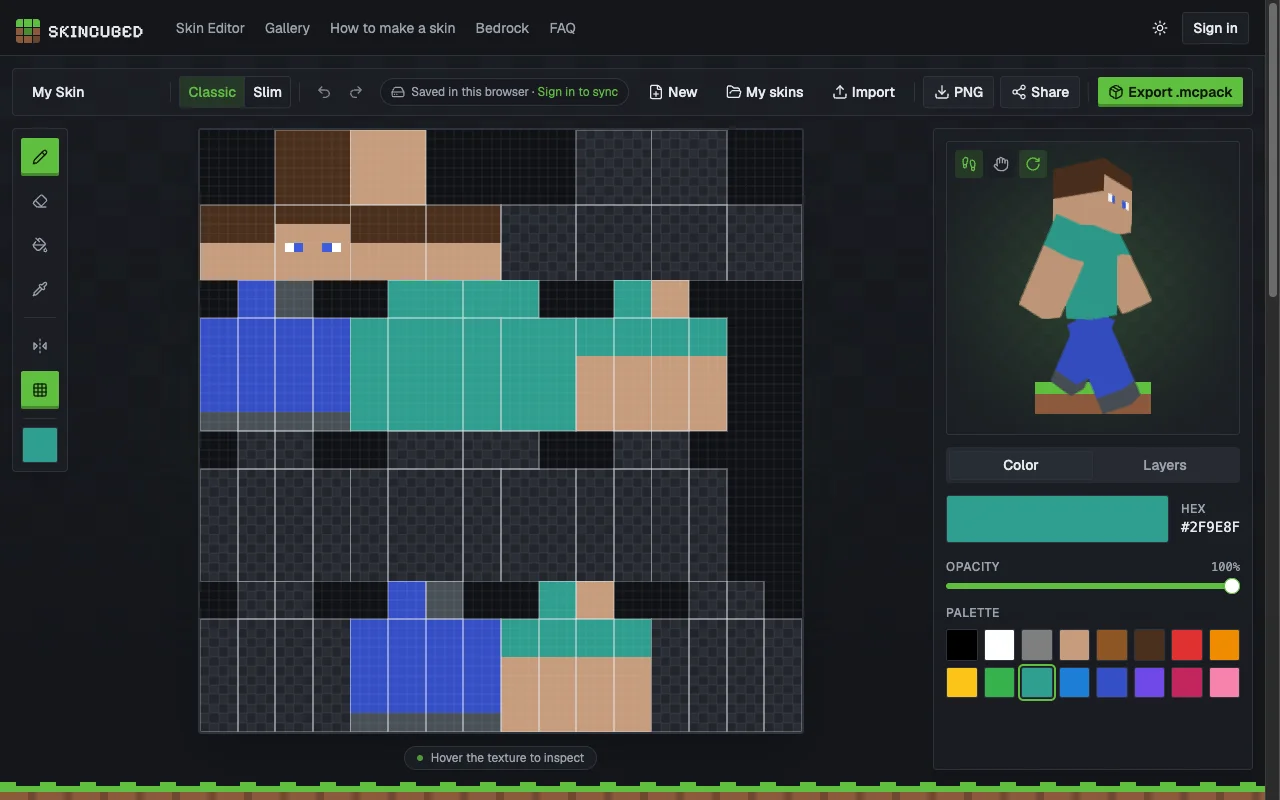
The texture and 3D character stay side by side while you paint. 2. Block in the face and outfit
Choose the pencil and a color, then paint on the flat texture. Start with the hair, face, shirt and trousers. Use face fill for larger areas and the color picker to reuse a shade. Turn on mirror drawing when you want matching left and right details, then turn it off for an asymmetric design.
3. Add shading and an outer layer
Give the outfit one lighter and one darker shade rather than adding unrelated colors. Paint jacket edges, hair details or cuffs on the overlay. Toggle layer visibility to check that the base underneath is complete. Undo a change if a line crosses a face boundary in the wrong place.
4. Inspect the moving character
Rotate the 3D preview to inspect the back, sides, shoulders and feet. Try the walk and wave controls to see the arms move. Look for seams between faces and transparent gaps in the base. If sleeves look wrong, check your Classic or Slim model choice before repainting.
5. Export for your edition
Download a PNG for Java Edition, or export a .mcpack skin pack for supported Bedrock devices. The PNG is the texture file you can edit again. The .mcpack includes that texture and the arm model information. Keep a PNG backup even if you only play Bedrock.

Choose the texture PNG for Java, or .mcpack for a supported Bedrock device.
Install the PNG in Java Edition
Open Minecraft Launcher, select Minecraft: Java Edition and open the Skins tab. Add a new skin, browse to your exported PNG and choose the arm model that matches your design. Save and use it, then launch the game to check the result. The PNG should be the original 64×64 texture, with its filename ending in .png.
If your sleeves are shifted, check Classic versus Slim in the launcher and in the editor. If a detail is missing, return to the texture and inspect its base and outer layer separately. Re-export after the change and upload the new PNG.
Import the pack in Bedrock Edition
Export .mcpack and open the file with Minecraft on Android, iPhone, iPad or Windows. Wait for the import confirmation, then choose the imported character in the Dressing Room under Classic Skins. If a browser only saves the file, open it from Downloads or Files. See the Bedrock pack and import instructions for platform details.
Custom skin import is separate from Marketplace purchases and the game's Character Creator. A texture changes the appearance of the existing player model; it does not add new geometry, gameplay powers or a cape. Importing the file on a phone does not make it available on a console through account sync.
Common questions while making your first skin
- How do I make a Minecraft skin from scratch?
- Choose Blank body in New skin, pick Classic or Slim arms and paint the face and outfit on the 64×64 texture. The blank body is a neutral gray guide, not a transparent canvas. Check all sides in 3D before exporting.
- Can I turn a photo into a Minecraft skin?
- This editor does not automatically turn photos into skins. Use a photo as a color or outfit reference, then draw the character in the skin layout. Import accepts skin PNG files, not arbitrary photos.
- Why does my downloaded skin look like a flat sheet?
- The PNG is a texture atlas: each rectangle maps to a face of the character. That flat sheet is the correct file to upload to Minecraft. Use the 3D preview to see it assembled; do not upload a screenshot of the preview.
- Can I keep working without an account?
- Yes. Painting, local autosave, preview and export work without signing in. Local saves stay in the current browser. Sign in for cloud saves or export a PNG before moving to another device.
Official references
For the game-side workflow, see Minecraft's introduction to skins. Microsoft's skin pack documentation explains the Bedrock files packaged with your texture.